When I start thinking about updating a main bathroom, the layout is always the first thing I look at because it shapes how the entire space feels and functions.
A good layout can make the room feel larger, brighter, and easier to use every day.
I like finding different arrangements because each one offers a new way to improve comfort and style.
Some layouts create more storage, while others open the room or make the shower and tub feel more relaxing.
Looking at layout ideas helps me understand what will work best for my space and what changes can bring the most significant impact.
Even minor adjustments in placement can create a cleaner, smoother flow.
What Does a Primary Bathroom Layout Mean?
A primary bathroom layout is the overall arrangement of fixtures, storage, and circulation in the main bathroom of a home.
This space is typically attached to the primary bedroom and is designed to support daily routines with comfort and efficiency.
The layout determines where the vanity, shower, tub, toilet, and storage areas are placed to create a functional flow.
A well-designed primary bathroom layout also considers privacy, ease of movement, and how natural or artificial light reaches key areas.
The goal of a primary bathroom layout is to create a practical, organized, and visually balanced environment that enhances the overall experience of the main suite.
Innovative Layouts for a Better Bathroom
A well-thought-out layout can make a main bathroom feel larger, easier to use, and more balanced. Small changes in placement, spacing, and flow can significantly.
1.15’10” × 15’6″ Split-Zone Master Bath Layout
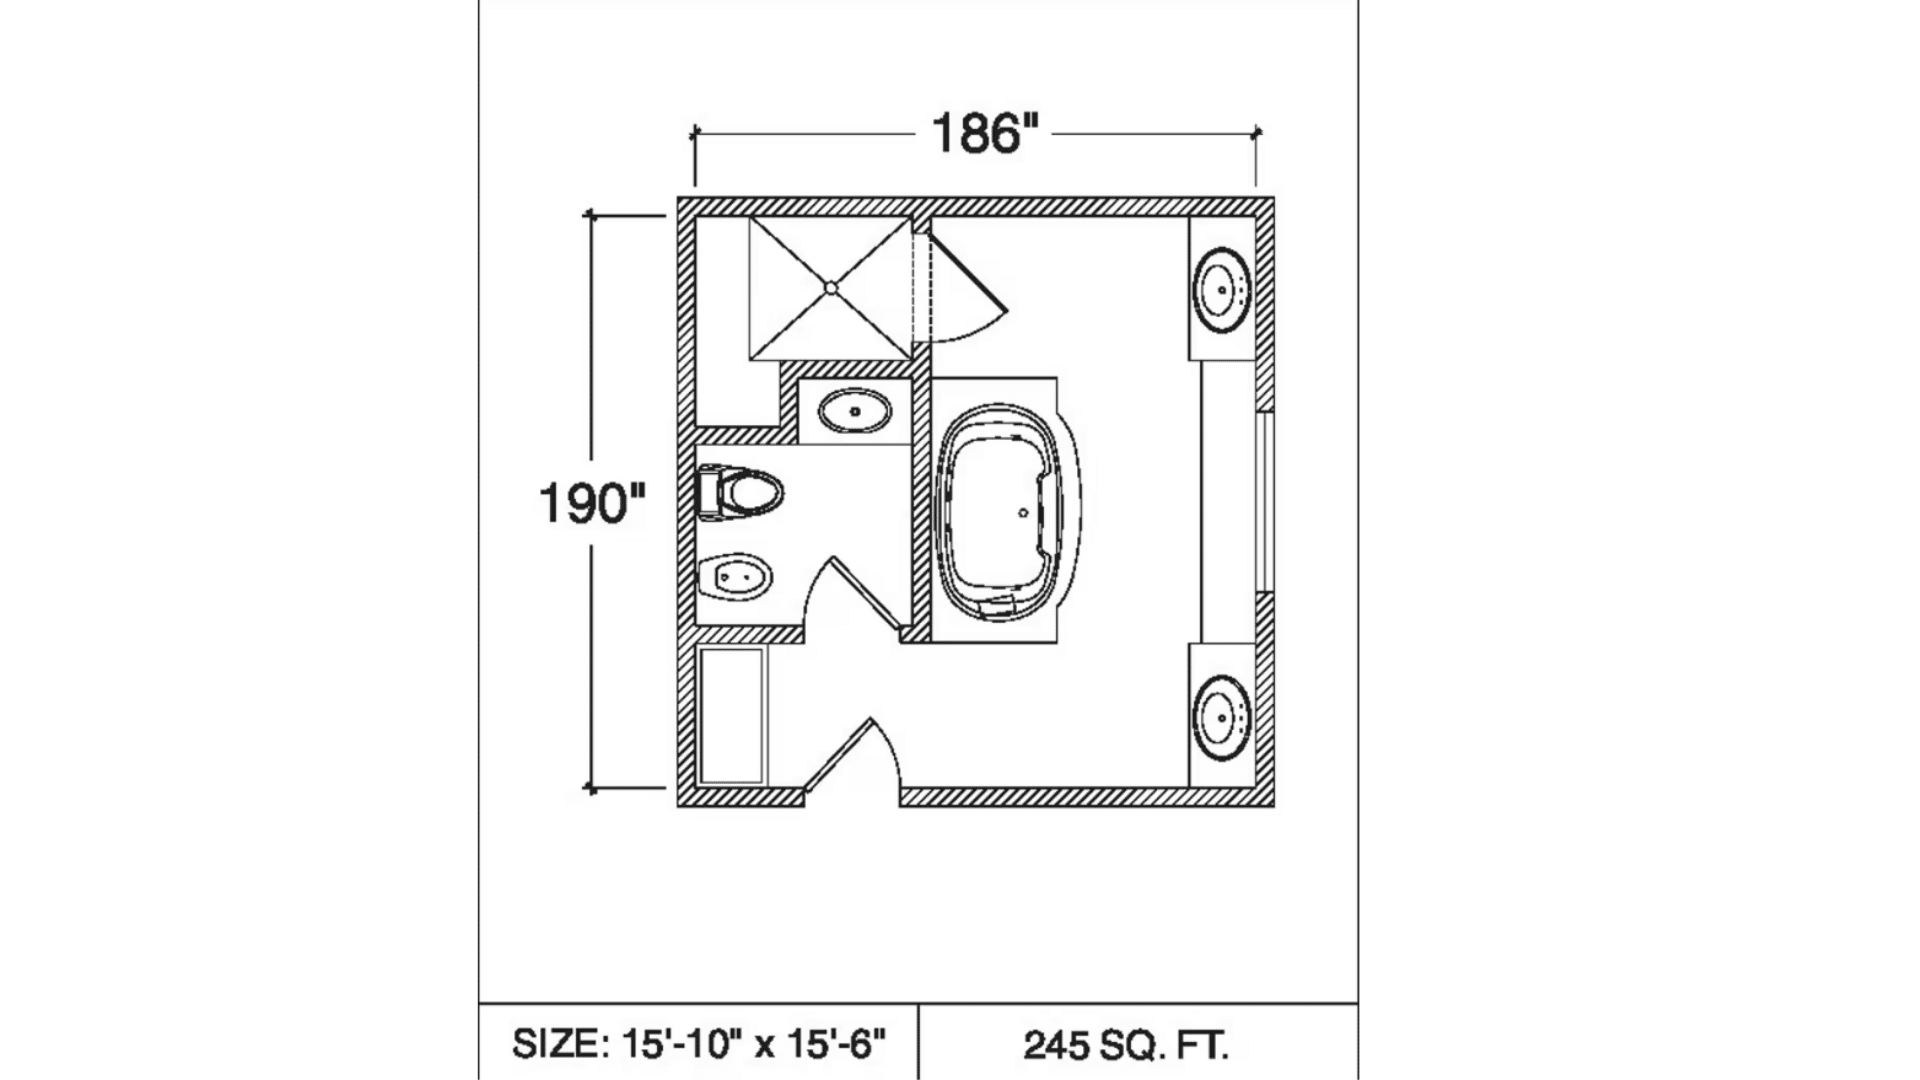
This main bathroom layout features a well-organized split-zone design. The entrance opens into a spacious central area anchored by a large freestanding bathtub.
On the left side, a private water closet includes a toilet and bidet, separated by an inward-swinging door.
Adjacent to it sits a compact single sink vanity. The top-left corner houses a generous walk-in shower with a pivot door.
On the right side of the room, two separate wall-mounted vanities provide balanced, dual utility.
2. 11’3″ × 19’2″ Angled Luxury Master Bath Layout
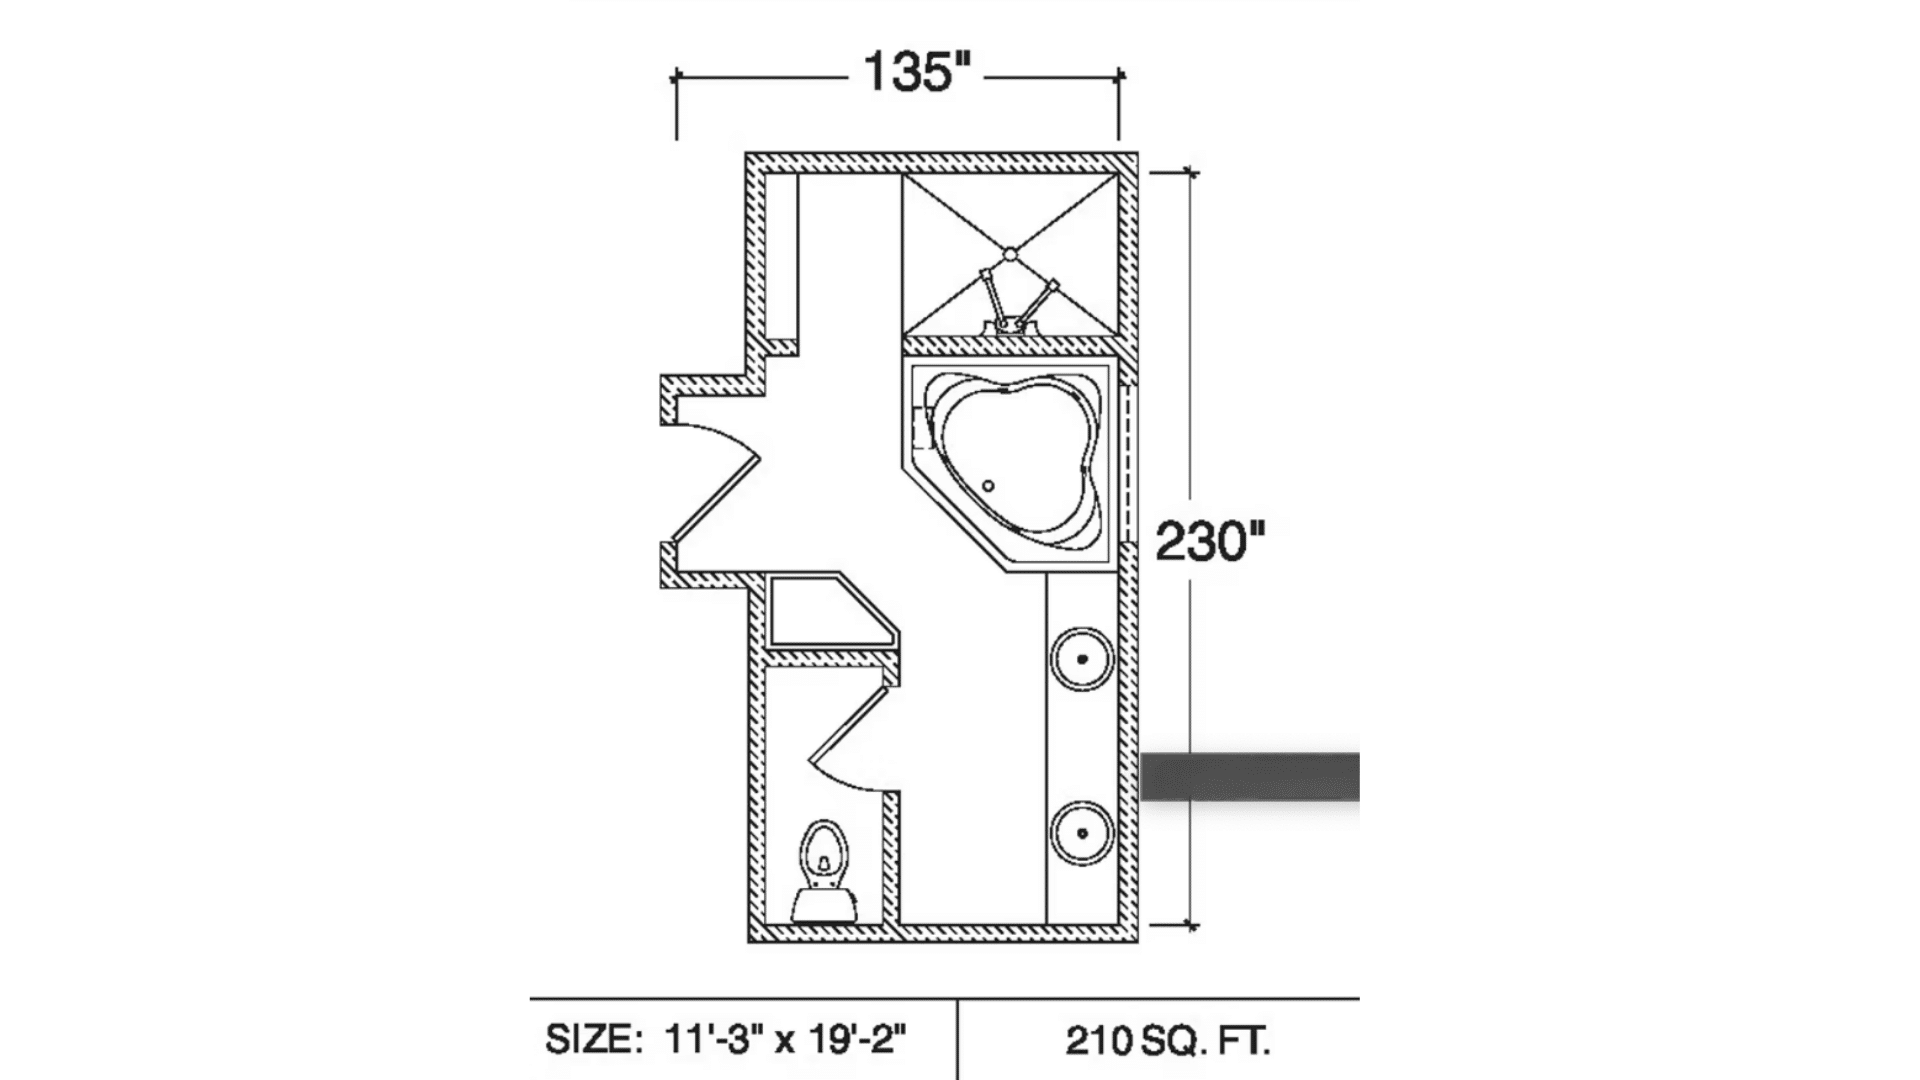
This layout uses unique angles to create an elegant, spa-like flow perfect for a remodel.
The standout feature is the angled soaking tub positioned in the upper right, ideal for adding mood lighting or decorative tile.
Directly above it sits a large corner walk-in shower with ample space for glass enclosures and upgraded fixtures.
A double vanity stretches along the right wall, offering symmetry and shared counter space.
3. 16’10” × 20’2″ Grand Symmetry Master Bath Layout
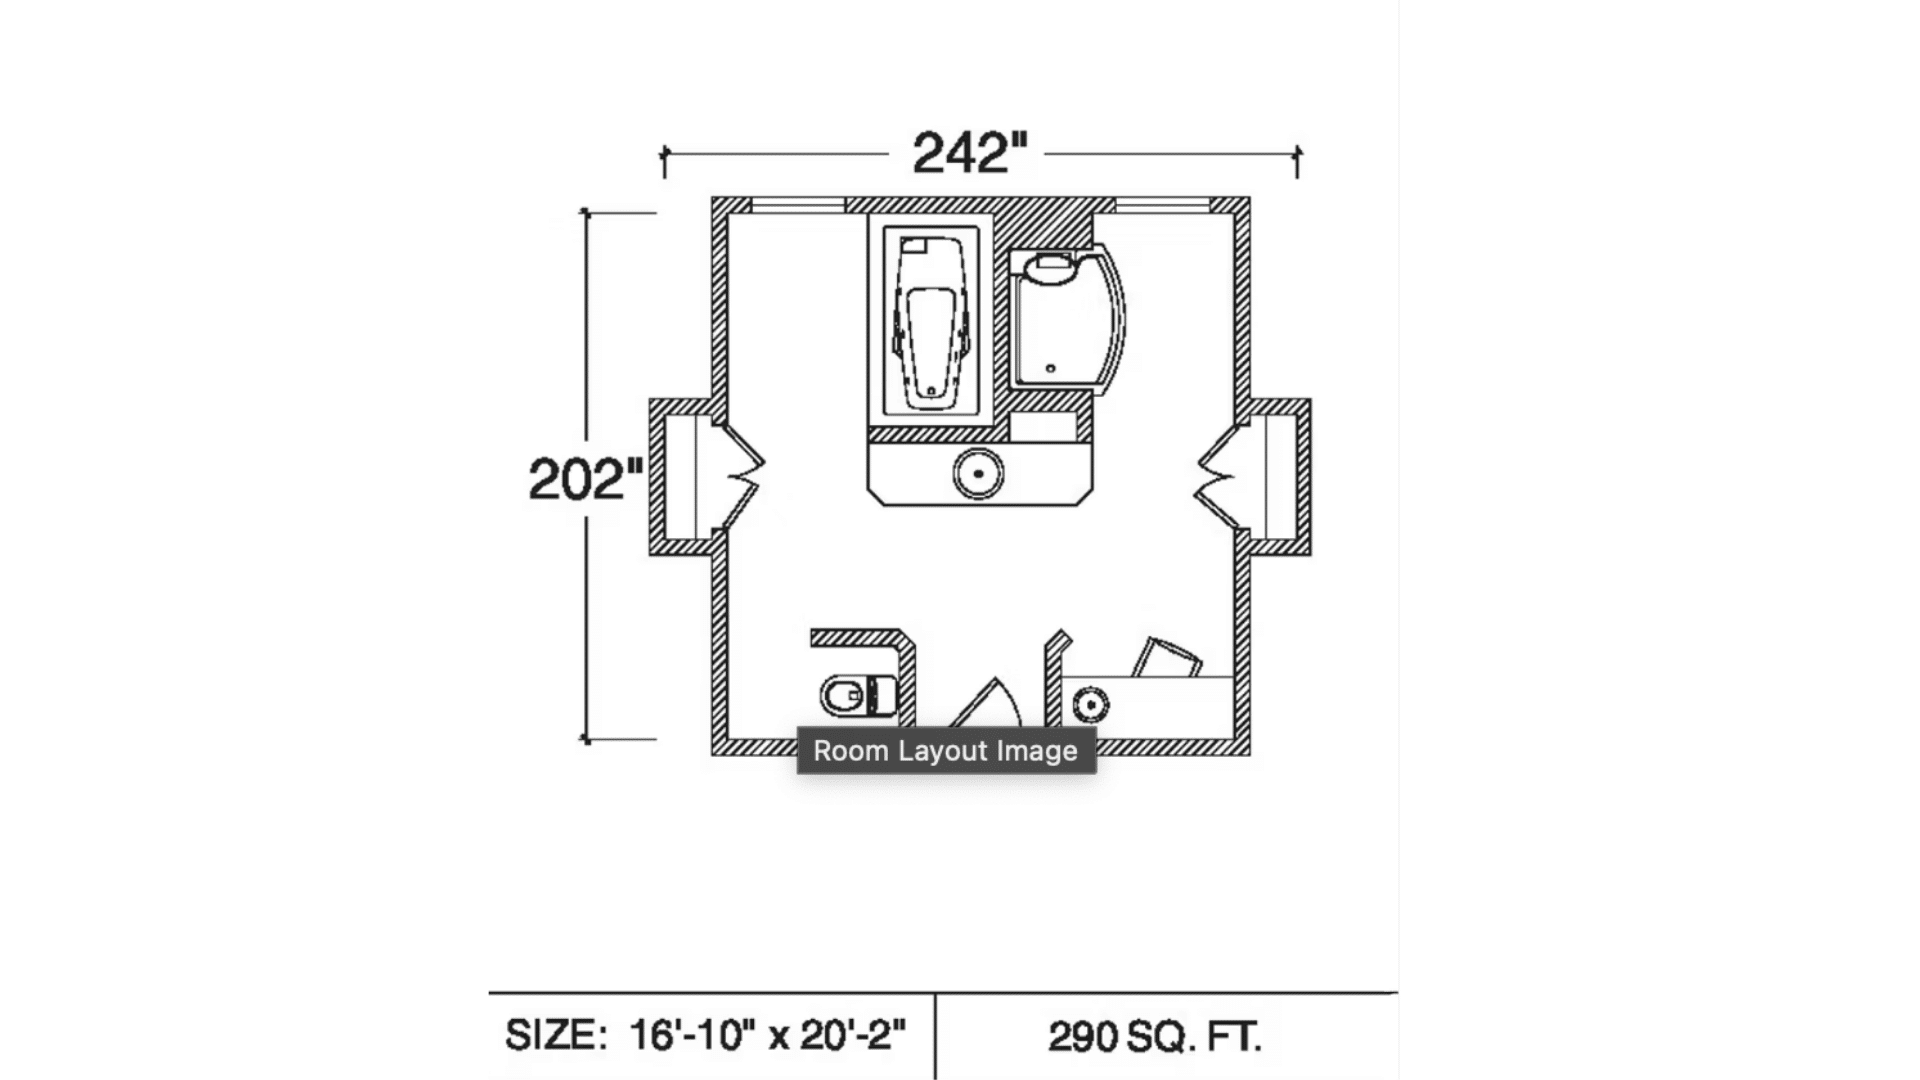
This main bathroom layout offers a spacious, balanced design perfect for a luxurious remodel.
The soaking tub sits in a central alcove at the top of the room, framed by symmetrical wall cutouts ideal for shelving, lighting, or statement tile.
To the right, a roomy walk-in shower with a curved door provides an elevated spa experience.
The lower portion features a private toilet room and a dedicated vanity area, giving the layout strong functionality.
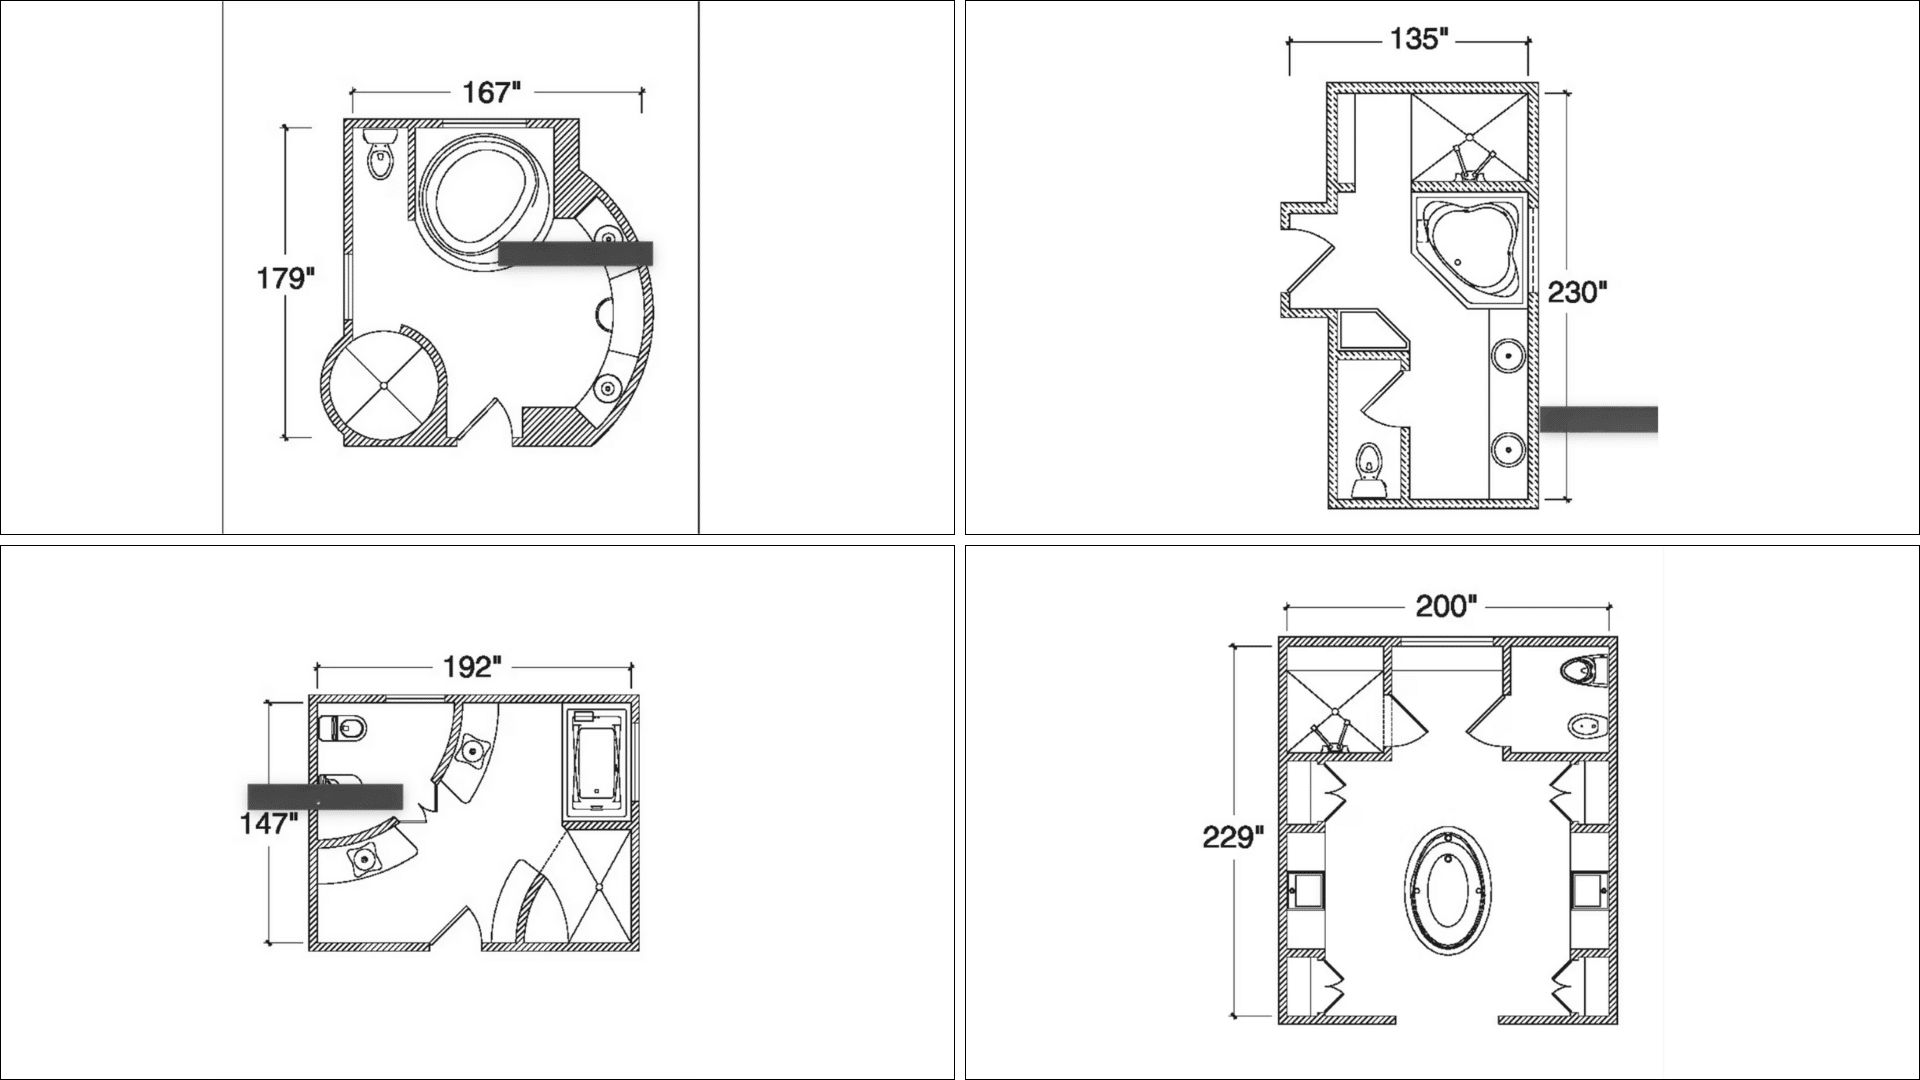
4. 14’11” × 13’11” Curved Oasis Master Bath Layout
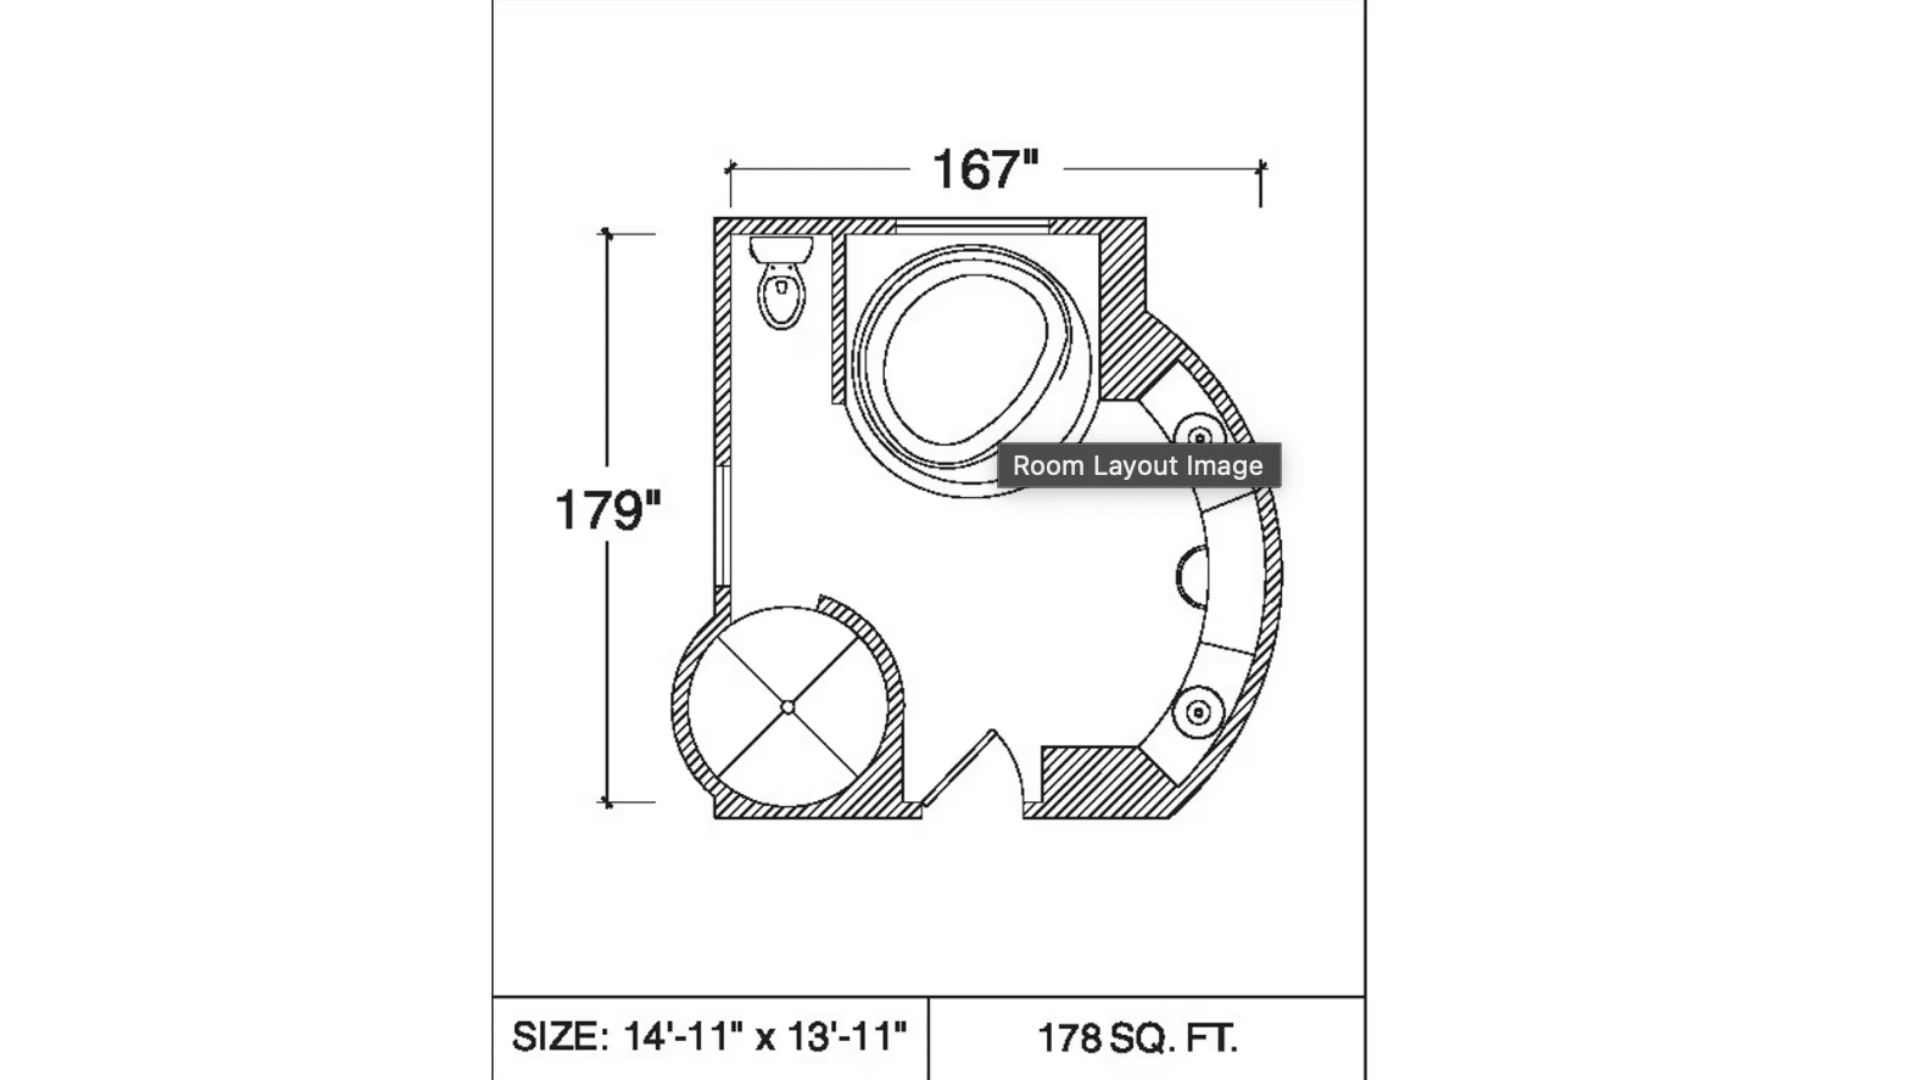
This layout stands out with its bold use of curved architecture, making it an ideal choice for a remodel that feels unique and luxurious.
The centerpiece is a large circular soaking tub positioned at the top of the room, creating a spa-like focal point.
A rounded walk-in shower sits to the left, offering an elegant enclosed space perfect for custom tile or rainfall fixtures.
On the right, a curved vanity wall adds visual interest and extra countertop space. A private toilet area is tucked away in the layout
5. 19’1″ × 16’8″ Gallery Master Bath Layout
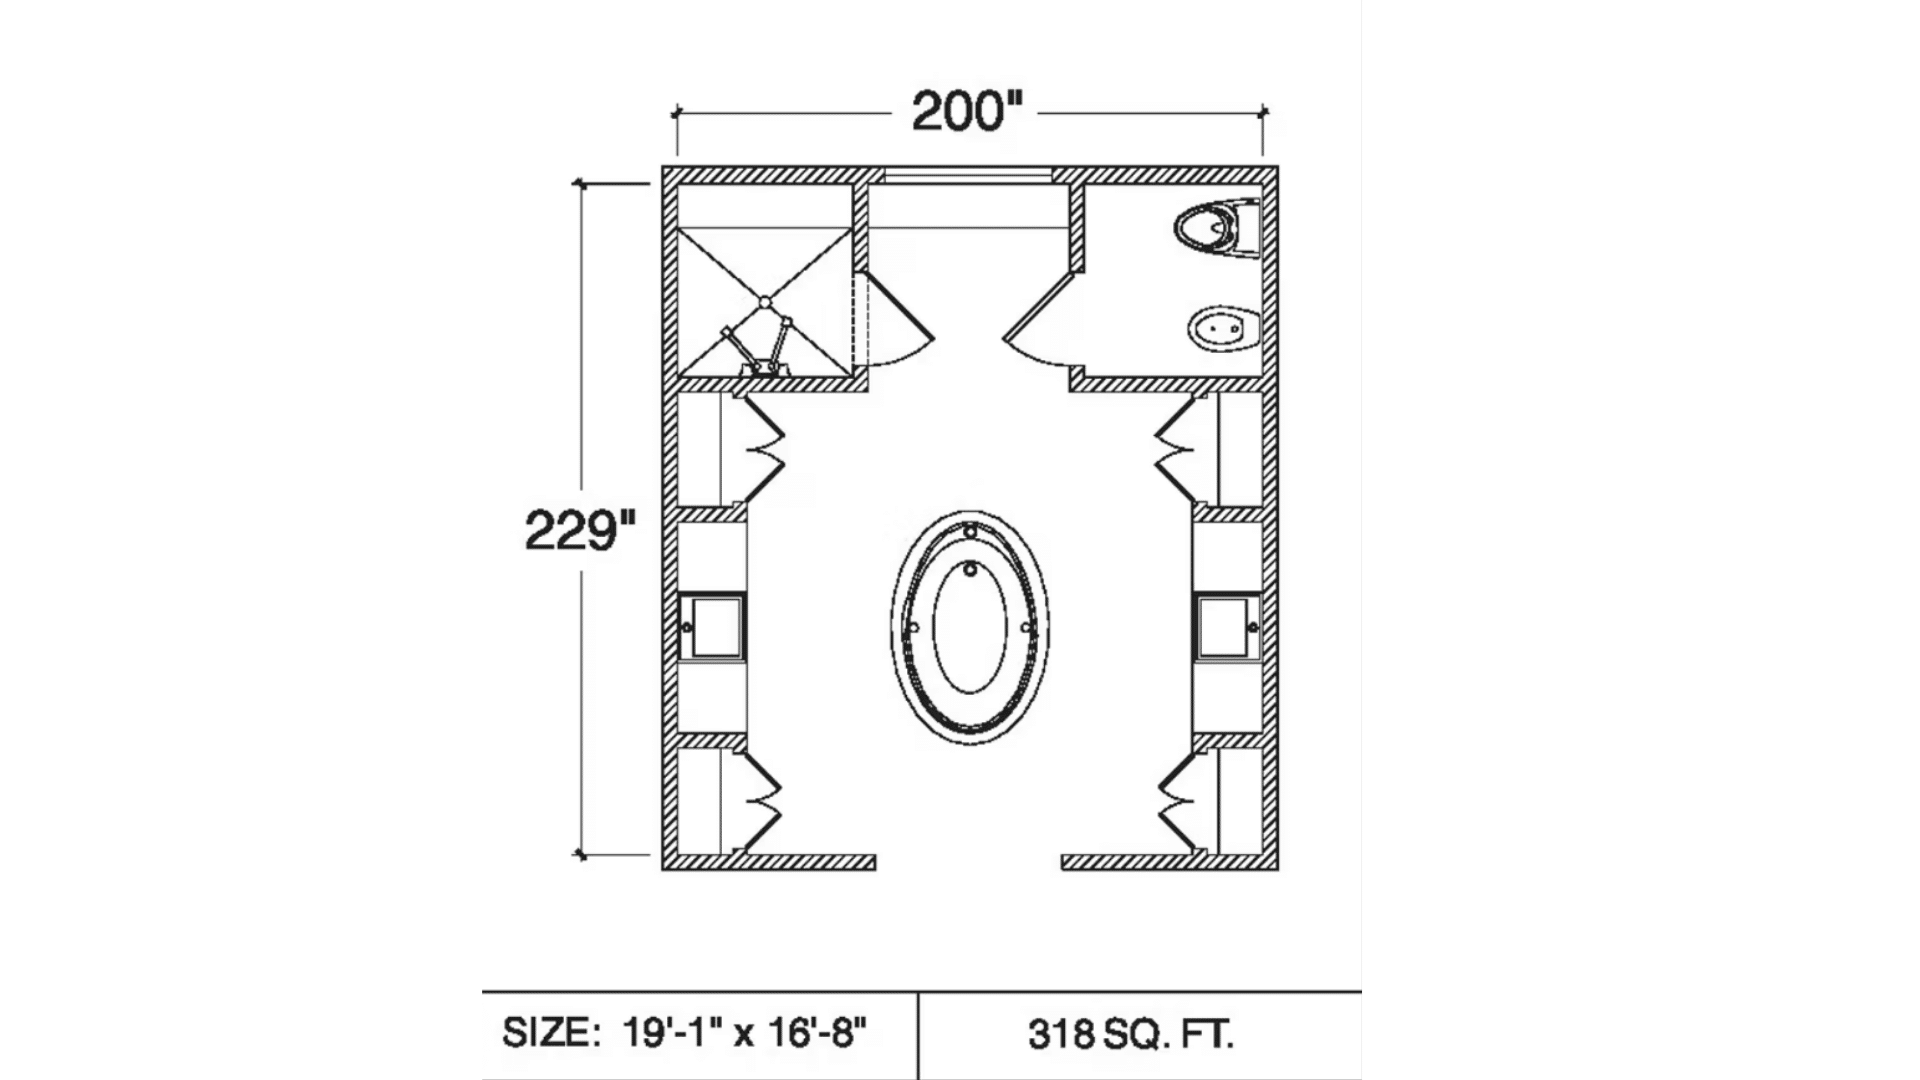
This main bathroom layout offers a spacious, gallery-style design perfect for a dramatic remodel.
The centerpiece is an elegant oval tub positioned in the middle of the room, giving the entire layout a luxurious, spa-like feel.
On both sides, symmetrical built-in shelving niches create opportunities for decorative displays, towels, or storage.
The upper-left corner features a generous walk-in shower, while the upper-right corner holds a private toilet and sink.
6. 12’3″ × 16’0″ Angled Flow Master Bath Layout

It uses angled elements to create a dynamic and functional design perfect for a remodel.
The right side features a spacious walk-in shower paired with a rectangular soaking tub, giving the layout a clean, modern flow.
At the center, two angled vanities face inward, creating a sense of symmetry while offering personal space for two users.
On the left, a compact but private toilet area is tucked neatly behind a partial wall, maximizing privacy.
7. 20’6″ × 11’0″ Long Suite Master Bath Layout
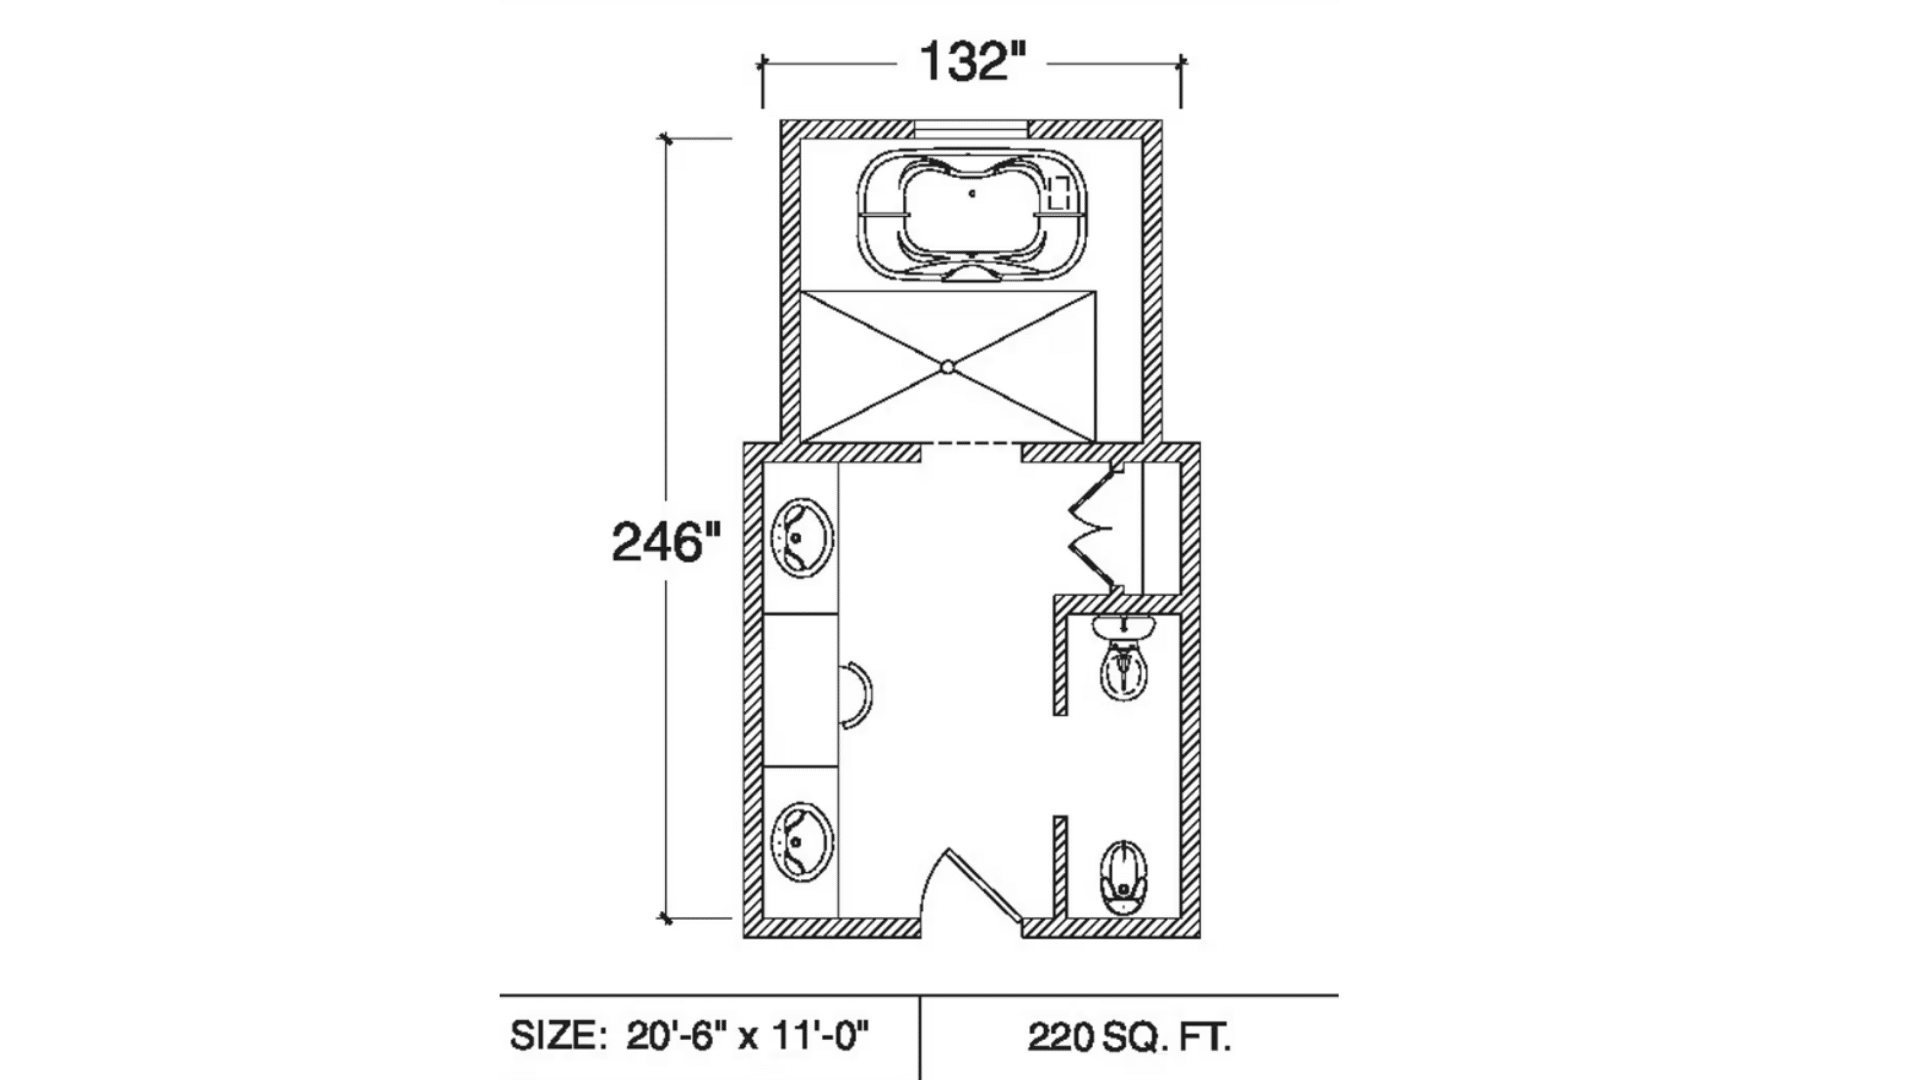
This bathroom layout uses a long, traditional-style layout that’s ideal for a remodel that requires both flow and function.
At the top, a spacious soaking tub sits beneath a large walk-in shower area, creating a relaxing spa zone.
The left side features an extended double vanity with generous counter space, perfect for couples who need extra room.
On the right, a private water closet includes both a toilet and a bidet, offering comfort and separation from the main area.
Features That Increase Comfort
When I think about creating a truly comfortable main bathroom, I focus on features that make everyday routines feel relaxing and effortless.
Upgrading to a spacious walk-in shower with multiple spray options instantly makes my mornings feel more enjoyable.
I also love the difference a deep soaking tub makes, especially when I want a quiet moment to unwind.
Heated floors and towel warmers add a cozy touch that makes cold days much more pleasant.
Even minor upgrades like soft-close drawers, dimmable lighting, and better ventilation help the space feel smoother and more calming.
By choosing comfort-focused features, I can turn a simple bathroom into a personal retreat that supports both relaxation and daily convenience.
Budget-Friendly Upgrade Ideas
When I want to refresh a master bathroom without overspending, I look for upgrades that make a noticeable impact on the setting while staying budget-friendly.
- Swap outdated faucets and fixtures for modern finishes.
- Add peel-and-stick backsplash or accent tile.
- Replace old lighting with warm, energy-efficient options.
- Update hardware on vanities and cabinets.
- Use fresh paint to brighten walls or trim.
- Add open shelves or baskets for stylish storage.
With a few smart updates, a bathroom can feel new without a significant investment.
Finishing Touches
While I’m finishing a main bathroom design, I like to add small details that make the entire space feel polished and complete.
Soft, coordinated towels, a few well-chosen accessories, and quality bath mats instantly add warmth and personality.
I also enjoy bringing in plants or natural textures because they make the room feel fresher and more inviting.
Even simple touches like decorative soap dispensers, a stylish tray, or framed artwork can make the bathroom feel thoughtfully designed.
Lighting plays a significant role, too, so I often layer soft accent lights or candles to create a relaxing atmosphere.
These finishing touches help me turn a functional room into a soothing, beautiful space that feels truly personal.
Conclusion
As I look back on all these layout ideas, I realize how much the right design can change the way a bathroom feels and works every day.
When the layout supports natural movement, good lighting, and precise spacing, the whole room becomes easier to use and far more relaxing.
Minor adjustments, like shifting a vanity, opening the shower area, or adding better storage, can make the space feel cleaner and more balanced.
A thoughtful layout also helps the bathroom fit my daily routine, making everything flow more smoothly.
In the end, choosing the correct layout helps create a bathroom that feels calm, functional, and pleasant to step into every single day.